Battery switch on travel trailer function is crucial for managing your RV’s power. Understanding how these switches work, from their various types (single-pole, double-pole, etc.) to their role in preventing battery drain, is key to a smooth and safe RVing experience. This guide breaks down everything you need to know about installing, maintaining, and troubleshooting your travel trailer’s battery switch system, ensuring you’re always ready for your next adventure.
We’ll cover the different types of switches, their wiring diagrams, common problems, and safety precautions. Plus, we’ll explore various configurations suitable for different setups, from single battery systems to more complex dual-battery systems with solar power integration. Get ready to become a battery switch expert!
Function and Purpose of Battery Switches: Battery Switch On Travel Trailer Function
A battery switch is a crucial component in a travel trailer’s electrical system, acting as a gatekeeper for power flow. It allows you to selectively connect and disconnect your house batteries from the rest of the trailer’s electrical system, as well as control the connection between your house batteries and your tow vehicle’s starting battery. This simple device offers significant benefits in terms of power management and protection.This control over power flow is essential for managing the energy stored in your house batteries and preventing unwanted drain.
The switch allows you to isolate the house batteries when your trailer is not in use, thereby preventing a slow drain that could leave you with a dead battery when you’re ready to hit the road. It also enables you to charge your house batteries using different sources, such as shore power or your tow vehicle’s alternator, while maintaining control over the charging process.
Battery Switch Management of Power Flow
The battery switch typically has several positions, often including “Off,” “Both,” “House,” and “Start.” The “Off” position completely disconnects both the house and starting batteries, preventing any power flow. The “Both” position connects both the house and starting batteries, allowing for charging of the house batteries from the vehicle’s alternator while driving. The “House” position connects only the house batteries to the trailer’s electrical system, while the “Start” position (if present) typically connects only the starting battery to the vehicle’s starting system.
This allows for selective use of battery power, ensuring the starting battery always retains enough charge to start your vehicle.
So, you’re an audiophile who travels? Awesome! Make sure you check out this guide on audiophile travel setups to keep your ears happy on the go. It’s crucial to protect your investment, right? That’s why securing travel insurance is a must; look into Aon travel insurance for comprehensive coverage. This way, you can enjoy amazing soundscapes wherever you roam, without worrying about unexpected mishaps to your gear or yourself.
Preventing Battery Drain and Protecting Sensitive Electronics, Battery switch on travel trailer function
By isolating the house batteries when the trailer is not in use, the battery switch significantly reduces the risk of parasitic drain. Parasitic drain refers to the slow, continuous discharge of a battery even when the trailer’s main systems are turned off. This drain can be caused by small appliances or electronics drawing power even when switched off. With the battery switch in the “Off” position, this drain is eliminated, preserving your battery’s charge.
Furthermore, disconnecting sensitive electronics from the power source when not in use, via the battery switch, can help protect them from voltage spikes or surges. This is particularly important for electronics that are sensitive to power fluctuations.
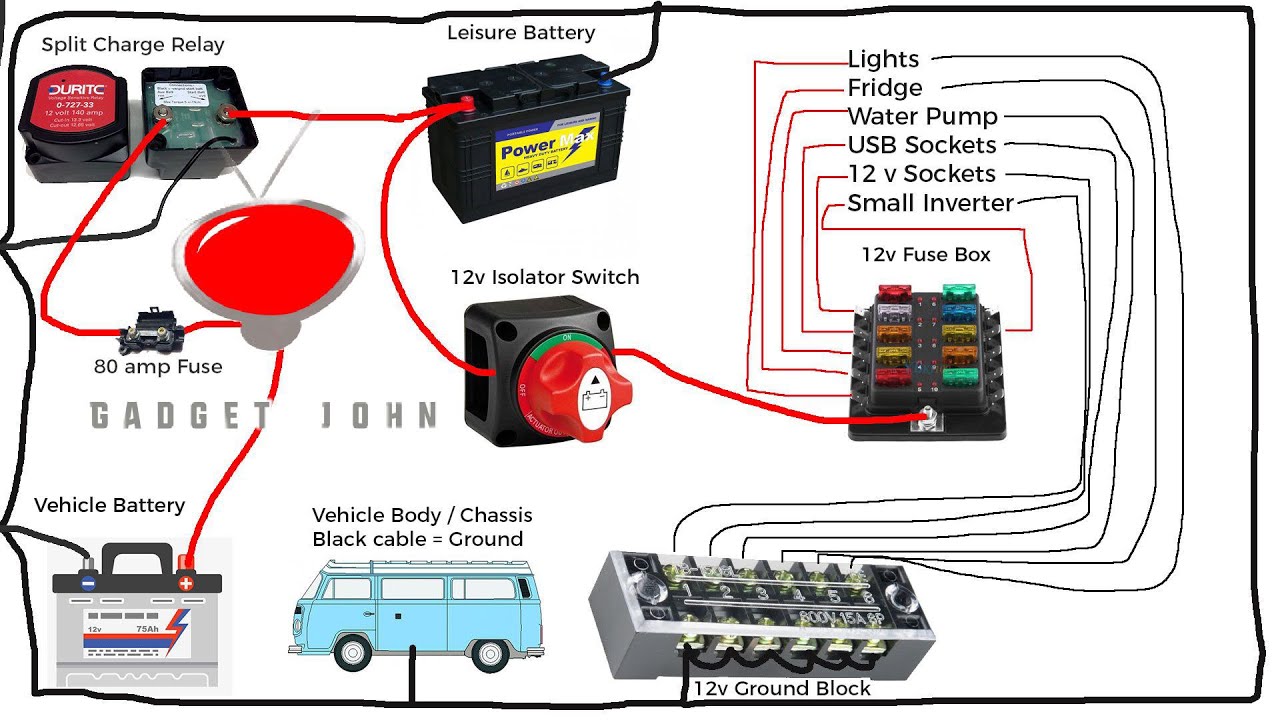
Wiring and Installation of Battery Switches
Installing a battery switch in your travel trailer is a straightforward process that significantly improves your RV’s electrical system management. Proper wiring ensures safe and reliable power distribution to your appliances and accessories. This section details the typical wiring diagram and provides a step-by-step guide for installation, emphasizing safety and best practices.
A typical wiring diagram for a battery switch in a travel trailer involves connecting the switch between the battery and the rest of the trailer’s electrical system. The switch acts as an on/off point, allowing you to disconnect the battery completely when not in use. This prevents parasitic drain and improves safety. The specific wiring will depend on the type of switch (single or dual battery) and the configuration of your trailer’s electrical system.
However, the fundamental principle remains the same: isolate the battery from the load when the switch is off.
Typical Wiring Diagram
Imagine a simple diagram: Your battery is at point A. From point A, a heavy-gauge wire runs to the battery switch (point B). From the battery switch (point B), another heavy-gauge wire runs to the positive (+) terminal of your trailer’s distribution panel (point C). A separate ground wire connects directly from the battery’s negative (-) terminal to the chassis of the trailer (point D), bypassing the switch.
This setup ensures the chassis remains grounded even when the battery switch is off. A more complex setup, for example, with dual batteries, would involve similar connections for each battery, often with a combiner to allow for charging both from a single source.
Step-by-Step Installation
Before starting any electrical work, always disconnect the negative (-) terminal of your battery to prevent accidental shorts and shocks. This is crucial for your safety and the protection of your RV’s electrical system.
- Choose a suitable location: Select a location for the battery switch that is easily accessible, well-ventilated, and protected from the elements. Ensure it’s close enough to the battery for convenient wiring.
- Mount the switch: Securely mount the battery switch using appropriate hardware. Ensure the switch is firmly attached and won’t vibrate loose during travel.
- Connect the positive (+) wire: Connect a heavy-gauge wire from the positive (+) terminal of your battery to the input terminal of the battery switch. Use appropriately sized ring terminals for a secure connection.
- Connect the output wire: Connect another heavy-gauge wire from the output terminal of the battery switch to the positive (+) terminal of your trailer’s distribution panel.
- Connect the ground wire: Connect a heavy-gauge wire directly from the negative (-) terminal of your battery to the trailer’s chassis. This ground wire should be securely attached to a clean, bare metal surface.
- Test the installation: After completing the wiring, reconnect the negative (-) terminal of your battery. Turn the switch on and check if the trailer’s electrical system is functioning correctly.
Cable Sizing and Connection Methods
Using appropriately sized cables is critical for safe and efficient operation. Undersized cables can overheat and cause damage, while oversized cables are unnecessary and wasteful. The correct cable size depends on the amperage draw of your trailer’s electrical system. Consult a qualified electrician or refer to the manufacturer’s specifications for your trailer and battery.
Always use appropriate connectors, such as ring terminals and crimp connectors, to ensure secure and reliable connections. Avoid using solder alone as it can become brittle over time and create a weak point in the circuit. Crimp connections should be properly crimped with the correct tool to ensure a solid, gas-tight connection.
Always use properly sized and insulated wires to prevent overheating and potential fire hazards.
Troubleshooting Common Battery Switch Issues
Battery switches are crucial for managing power in your travel trailer, so understanding how to troubleshoot problems is essential for a smooth camping experience. A malfunctioning switch can leave you without lights, appliances, or even the ability to charge your batteries. This section will guide you through identifying and resolving common issues.Troubleshooting battery switch problems often involves a combination of visual inspection and electrical testing.
A methodical approach, starting with the simplest checks, will help you pinpoint the source of the problem quickly and efficiently. Remember safety first – always disconnect power before working with electrical components.
Visual Inspection of the Battery Switch
Begin by carefully examining the battery switch itself. Look for any obvious signs of damage, such as loose connections, corrosion on the terminals, or physical damage to the switch housing. Corrosion can significantly impede current flow, leading to poor or intermittent power. Loose connections can cause similar problems. Pay close attention to the wiring – ensure all wires are securely fastened and undamaged.
A broken or frayed wire is a clear indication of a problem. If you find any corrosion, carefully clean the terminals with a wire brush and baking soda paste, then rinse with water and allow to dry completely before reconnecting.
Voltage Testing Procedures
After a visual inspection, use a multimeter to check voltages at various points in the circuit. First, verify the voltage at the battery itself. This confirms if the battery is actually charged and capable of supplying power. A fully charged 12-volt battery should read approximately 12.6 volts. Next, measure the voltage at the input terminals of the battery switch.
A significant voltage drop between the battery and the switch input indicates a problem with the wiring between them. Finally, measure the voltage at the output terminals of the switch. If the voltage at the output is significantly lower than the input, the switch itself may be faulty. A lack of voltage at the output, even with input voltage present, confirms a switch problem.
Troubleshooting Flowchart
Here’s a step-by-step guide to help you troubleshoot your battery switch:* Step 1: Visual Inspection: Carefully examine the battery switch and wiring for any visible damage, loose connections, or corrosion. Clean any corroded terminals.
Step 2
Battery Voltage Check: Use a multimeter to measure the voltage directly at the battery terminals. A low voltage reading indicates a charging problem, not necessarily a switch issue.
Step 3
Input Voltage Check: Measure the voltage at the input terminals of the battery switch. A significant voltage drop compared to the battery indicates a wiring problem between the battery and the switch.
Step 4
Output Voltage Check: Measure the voltage at the output terminals of the switch. If the voltage is significantly lower than the input voltage, or absent entirely, the switch is likely faulty.
Step 5
Wiring Inspection: If voltage drops are found, trace the wiring carefully, looking for breaks, loose connections, or damage along the wire runs.
Step 6
Switch Replacement (if necessary): If all other checks are satisfactory, and the switch still isn’t functioning correctly, replacement of the switch is likely required.
Battery Switch Maintenance and Replacement
Keeping your travel trailer’s battery switch in top condition is crucial for reliable power and preventing costly repairs down the road. Regular maintenance and timely replacement can significantly extend the lifespan of your system and ensure you always have power when you need it. Neglecting maintenance can lead to corrosion, overheating, and ultimately, failure of the switch, leaving you stranded without power.
Regular Maintenance Schedule for Travel Trailer Battery Switches
A simple maintenance schedule can greatly improve the longevity of your battery switch. This involves visual inspections and occasional cleaning to prevent corrosion buildup, which is a common culprit in battery switch failures.
- Monthly Inspection: Visually inspect the switch for any signs of corrosion, loose connections, or damage to the casing. Look for any discoloration or white powdery residue around the terminals. This is a sign of corrosion and should be addressed immediately.
- Quarterly Cleaning: Use a wire brush or sandpaper to gently clean any corrosion from the terminals and the switch itself. Apply a thin layer of dielectric grease to the terminals after cleaning to prevent future corrosion. Ensure the switch is disconnected from the battery before cleaning.
- Annual Deep Cleaning: Once a year, disconnect the battery, remove the switch (if easily accessible), and thoroughly clean it with a suitable cleaner and brush. Pay close attention to the internal components if accessible. Re-apply dielectric grease after cleaning and reinstalling the switch.
Tips for Extending the Lifespan of a Battery Switch
Several practices can significantly extend the life of your battery switch. These practices focus on minimizing exposure to the elements and preventing excessive wear and tear.
- Protect from the Elements: If your battery switch is exposed to the elements, consider adding a protective cover to shield it from moisture, dust, and extreme temperatures. A simple waterproof box can make a big difference.
- Use High-Quality Dielectric Grease: Applying a good quality dielectric grease regularly prevents corrosion and ensures smooth operation of the switch’s moving parts. This is one of the most effective preventative measures.
- Avoid Over-Tightening: Over-tightening the terminal connections can damage the switch and lead to premature failure. Tighten them securely, but avoid excessive force.
- Proper Wiring: Ensure all wiring connections are secure and properly insulated. Loose connections can cause overheating and damage the switch.
Replacing a Faulty Battery Switch
Replacing a faulty battery switch is a relatively straightforward process, but it requires careful attention to safety. Always disconnect the battery before working on any electrical components.
- Disconnect the Battery: This is the most crucial step. Disconnect both the positive (+) and negative (-) terminals from the battery. Wait a few minutes to ensure the system is completely de-energized.
- Remove the Old Switch: Carefully disconnect the wires from the old switch. Take note of which wire goes to which terminal. Use a camera or take detailed notes to avoid confusion during reinstallation. Unscrew or unbolt the old switch from its mounting location.
- Install the New Switch: Mount the new switch in the same location as the old one. Securely connect the wires to the corresponding terminals, matching the connections noted previously. Ensure all connections are tight but not over-tightened.
- Reconnect the Battery: Carefully reconnect the positive (+) and negative (-) terminals to the battery. Double-check all connections before turning on any electrical appliances.
- Test the Switch: Turn the switch on and off to ensure it’s functioning correctly. Check all your trailer’s electrical systems to verify everything is working properly.
Safety Considerations with Battery Switches

Working with batteries and electrical systems in your travel trailer requires careful attention to safety. Improper installation or use of battery switches can lead to serious hazards, including electric shock, fire, and even explosions. Understanding and adhering to safety precautions is crucial to prevent accidents and ensure the longevity of your equipment.Battery switches, while convenient, introduce potential risks if not handled correctly.
The high amperage involved in handling RV batteries necessitates a cautious approach. A simple mistake can have significant consequences. This section details important safety measures to minimize these risks.
Potential Hazards of Improper Battery Switch Use
Improper installation can lead to loose connections, sparking, and overheating, potentially igniting flammable materials near the battery. Incorrect switch operation can cause short circuits, resulting in damaged equipment and fire hazards. Furthermore, working with lead-acid batteries exposes you to corrosive sulfuric acid, which can cause skin burns and eye damage. Finally, the release of hydrogen gas during charging or discharging poses an explosion risk if ignited by sparks.
Safety Precautions When Working with Batteries and Electrical Systems
Before undertaking any work on your travel trailer’s electrical system, always disconnect the negative (-) battery terminal. This prevents accidental short circuits and protects you from electrical shock. Wear appropriate safety glasses to protect your eyes from potential splashes of battery acid. Use insulated tools to avoid accidental contact with live wires. Work in a well-ventilated area to dissipate any hydrogen gas produced by the batteries.
Never smoke or use open flames near batteries. Always refer to the manufacturer’s instructions for both the battery and the switch.
Safety Guidelines for Battery Switch Use and Maintenance
- Always disconnect the negative (-) battery terminal before working on any part of the electrical system.
- Wear safety glasses and gloves when handling batteries.
- Use insulated tools to prevent electrical shocks.
- Work in a well-ventilated area to prevent hydrogen gas buildup.
- Never use open flames or smoke near batteries.
- Inspect battery terminals and connections regularly for corrosion and looseness.
- Clean battery terminals with a wire brush and baking soda solution to remove corrosion.
- Ensure all connections are tight and secure.
- Follow the manufacturer’s instructions for proper battery switch operation and maintenance.
- If you are unsure about any aspect of the installation or maintenance, consult a qualified electrician.
Different Battery Switch Configurations
Choosing the right battery switch configuration for your travel trailer depends heavily on your power needs and budget. This section Artikels three common setups, comparing their complexity, cost, and functionality to help you make an informed decision. Remember, always consult with a qualified electrician before undertaking any electrical work on your RV.
Three Battery Switch Configurations for Travel Trailers
Below, we detail three distinct battery switch configurations, ranging from simple to more complex setups. Each design addresses different power needs and budgets.
So, you’re an audiophile who travels? Awesome! Make sure you check out this guide on building the perfect audiophile travel setup before you go. It’s crucial to protect your gear, and while you’re planning, don’t forget about travel insurance! Getting Aon travel insurance will give you peace of mind knowing your investments are covered if anything goes wrong.
Having both sorted will ensure you enjoy amazing sound on the go and worry less about potential mishaps.
| Configuration | Complexity | Cost | Functionality |
|---|---|---|---|
| Single Battery System | Low | Low | Supports basic power needs; one battery powers all 12V appliances. |
| Dual Battery System with Isolator | Medium | Medium | Two batteries; one for house functions, one for starting the tow vehicle; prevents battery drain. |
| Dual Battery System with Solar and Battery Combiner | High | High | Two batteries; solar panel charges both; sophisticated power management. |
Single Battery System
This is the simplest configuration. A single 12-volt deep-cycle battery powers all the 12-volt appliances in your travel trailer. It’s easy to install and inexpensive. However, it’s limited in capacity and may not be sufficient for extended off-grid use, especially if you have energy-intensive appliances. A simple battery switch allows you to disconnect the battery from the trailer’s electrical system when not in use.
Dual Battery System with Isolator
This setup uses two 12-volt deep-cycle batteries. One battery powers the house systems (lights, water pump, etc.), while the other starts the tow vehicle’s engine. An isolating diode or a more sophisticated battery isolator prevents the house battery from draining the starting battery, and vice versa, ensuring reliable starts even after prolonged off-grid use. This is a significant improvement over the single battery system in terms of capacity and preventing dead batteries.
The added cost is primarily from the isolator.
Dual Battery System with Solar and Battery Combiner
This is the most complex and expensive configuration but offers the greatest functionality. It includes two 12-volt deep-cycle batteries, a solar panel array, and a battery combiner. The solar panel charges both batteries. The combiner intelligently manages the charging and discharging of both batteries, ensuring optimal power usage and preventing overcharging or deep discharging. This setup provides significant off-grid power capabilities, ideal for extended camping trips or boondocking.
The increased cost reflects the additional components (solar panels, charge controller, battery combiner) and increased installation complexity.
Illustrative Examples of Battery Switch Applications
Let’s look at how battery switches improve life in a travel trailer by examining three common scenarios. Understanding these examples will solidify your understanding of their practical applications and benefits.
Scenario 1: Protecting Your House Batteries While Boondocking
This scenario focuses on preserving your house batteries while off-grid. Imagine you’re enjoying a week-long boondocking trip, relying solely on your travel trailer’s house batteries for power. You’re using a 1-2-Both battery switch. This type of switch allows you to isolate your house batteries completely from your tow vehicle’s battery. With the switch in the “House” position, all power comes from your house batteries, powering lights, refrigerator, and other appliances.
Crucially, if you leave your trailer for a few days, you can switch to the “Off” position to completely disconnect your house batteries, preventing parasitic drain from devices like your carbon monoxide detector or a low-power refrigerator. When you return, simply switch to the “House” position to resume normal operation. The benefits here are clear: preventing complete battery drain and extending the life of your house batteries.
Scenario 2: Charging House Batteries While Towing
This example demonstrates using a battery switch to charge your house batteries while traveling. You’re towing your trailer to a campground, and you want to ensure your house batteries are fully charged upon arrival. You’re using a 1-2-Both battery switch again. While towing, you select the “Both” position. This connects both your vehicle’s battery and your house batteries, allowing your vehicle’s alternator to charge both battery banks simultaneously.
This setup ensures your house batteries are topped off before you reach your destination, ready to power your appliances. The advantage is a fully charged battery bank upon arrival, eliminating the need for immediate charging at the campground and ensuring uninterrupted power.
Scenario 3: Managing Multiple Battery Banks with a More Complex Switch
In this scenario, we have a larger travel trailer with multiple battery banks – one for house power and another dedicated to a solar panel charging system. Here, a more complex switch, perhaps a multi-bank switch or a combination of switches, is employed. The house bank powers the typical household appliances, while the solar bank is dedicated to charging from the solar panels on the roof.
A battery combiner may also be used in conjunction with this setup. The switch allows for independent control of each bank, enabling selective charging from the vehicle’s alternator or solar panels, as well as isolating the banks for maintenance or to prevent discharge from one affecting the other. The benefit is the efficient management of multiple power sources and enhanced control over the charging and usage of each battery bank, optimizing power utilization and battery lifespan.
Mastering your travel trailer’s battery switch system is vital for reliable power and preventing costly damage. By understanding the various types of switches, their functions, and common troubleshooting steps, you can confidently manage your RV’s electrical system. Remember to prioritize safety during installation and maintenance, and don’t hesitate to consult a professional if needed. Happy travels!
FAQ Corner
What happens if my battery switch is faulty?
A faulty switch can lead to no power, intermittent power, or even overheating. This could damage your batteries or other electrical components.
How often should I check my battery switch?
Regularly inspect your switch for corrosion, loose connections, and signs of overheating. A visual check every few months is a good practice.
Can I install a battery switch myself?
While possible for those with electrical experience, incorrect installation can be dangerous. If unsure, consult a qualified RV technician.
What size wire do I need for my battery switch?
Wire size depends on the amperage of your system. Consult a wiring chart or professional for the correct gauge.
